Setting up a WebDAV server
Do you want to install a WevDAV server? This article is for you.
What is WebDAV?
WebDAV is a protocol that lets you read and write files on the web almost as if you were accessing local files. You can create folders and files, as well as rename them, delete them and perform most common operations on them.
It stands for Web-based Distributed Authoring and Versioning. Since WebDAV is an extension to the HTTP protocol, you can still use features like security during file transfers (via HTTPS) or password protection on files and folders on the server.
Why a WebDAV server?
Because that way you can access your files from any computer connected to the web. The information where you need it, when you need it.
But, why not to use FTP, HTTP, or SSH?
FTP. It lacks security. Usernames and passwords are sent in clear text and can be intercepted by someone else.
HTTP. You can get documents, but how do you put them back on the server? Or what if you need to copy a folder and all its contents? Will you click on every link to download them?
SSH. You need a special application installed on the client to connect to your files. What if you cannot install it? If you cannot setup file transfer on client computer, how are you going to edit that Word document?
Starting up
This installation was performed on an Ubuntu computer. If yours is not, you might still use this page as a guide or install first Ubuntu on your computer 🙂
Since WebDAV extends the HTTP protocol, first thing we need is a web server. So, install the apache server:
sudo apt-get install apache2
When installation finishes you will need to enable the DAV module which is already included in the Apache package.
sudo a2enmod dav
sudo a2enmod dav_fs
www-data is the default username created by Apache. Be sure it has write permissions to the DocumentRoot directory (this is usually /var/www)
sudo chmod -R u+w /var/www
Now, set up the digest authentication module (this is not really required, but is strongly recommended):
sudo a2enmod auth_digest
And create a couple users who can remotely modify files on the WebDAV server:
sudo htdigest -c /etc/apache2/webdav-passwd webdav user1
sudo htdigest /etc/apache2/webdav-passwd webdav user2
webdav-passwd is the file where user/password information will be stored and webdav is the realm. You can change this information to whatever you want as long as you use it consistently.
Now it’s time to edit the default apache configuration file:
sudo nano /etc/apache2/sites-available/default
Add the following lines at the end, before the </VirtualHost> line.
Alias /webdav /var/www
<Location /webdav>
  DAV on
  AuthType Digest
  AuthName webdav
  AuthDigestProvider file
  AuthUserFile /etc/apache2/webdav-passwd
  Require valid-user
</Location>
What we are doing here is creating an alias (/webdav) that let us access the root of our http server (/var/www) using the WebDAV protocol (DAV on). Also we are asking that all users who want to access send a valid username and password (Require valid-user) using digest authentication (AuthType Digest). The information they send will be checked against the file we created before (AuthName, AuthDigestProvider and AuthUserFile).
Save your file. Now it’s time to reload our server for changes to take effect:
sudo /etc/init.d/apache2 force-reload
At this point, you have setup your server using the plain HTTP protocol and have setup usernames and passwords to protect from unauthorized writers. If you want to setup HTTPS keep reading.
Setting up HTTPS
First, install openssl (this should not be necessary, but just in case):
sudo apt-get install openssl
Enable the Apache ssl module:
sudo a2enmod ssl
Generate a personal certificate for your server (do not forget the password you use to create the server.key file, you will need it during the whole process):
sudo openssl genrsa -des3 -out server.key 1024
sudo openssl req -new -key server.key -out server.csr
sudo openssl x509 -req -days 365 -in server.csr -signkey server.key -out server.crt
You should have three files: server.key, server.csr and server.crt. Copy server.key and server.crt to the certs and private directories as shown next:
sudo cp server.crt /etc/ssl/certs
sudo cp server.key /etc/ssl/private
Edit your ports.conf configuration file:
sudo nano /etc/apache2/ports.conf
And comment the first line as shown:
#Listen 80
<IfModule mod_ssl.c>
  Listen 443
</IfModule>
This will block regular HTTP calls to your server, but permit HTTPS ones.
Finally, you must configure Apache so it knows where your certificate is:
sudo nano /etc/apache2/sites-available/default
and add the following lines after the DocumentRoot line:
SSLEngine on
SSLOptions +FakeBasicAuth +ExportCertData +StrictRequire
SSLCertificateFile /etc/ssl/certs/server.crt
SSLCertificateKeyFile /etc/ssl/private/server.key
save your changes and reload Apache:
sudo /etc/init.d/apache2 force-reload
Your WebDAV server is now fully configured!, and it’s time to try it.
Accessing the WebDAV server from Windows
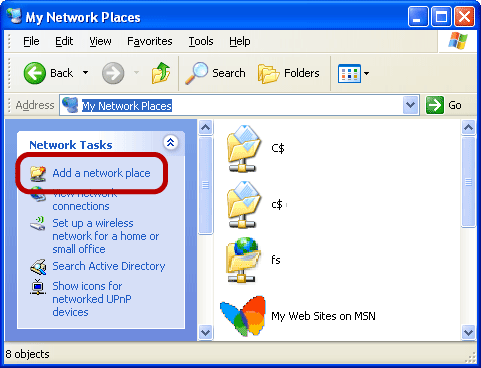
Open My Computer and go to My Network Places. Click on Add a network place.
Click Next.
Select “Choose another network location” and click Next.

Type https://your.ip.address/webdav/ and click Next. If you don’t know what your IP address is you can check it in this site.

Accept the certificate by pressing Yes and type your username and password. Click ok.
Type a friendly name for your connection and click Next.
Click Finish.
Once you are done, you will find a new folder inside your My Network Places folder. Double click it to open it. It will warn you about the security certificate (click Yes) and ask you again for your username and password. After this, you should see an empty window similar to the next one.
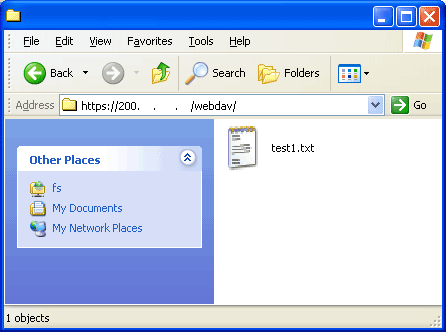
Congratulations! you did it! Try creating a file using Word or whatever. Save it to your desktop and Cut and Paste it to your remote server window and after some seconds you should see it there. Cut it again from your remote server and paste it to your desktop. Isn’t it great!?
Some applications like Microsoft Office will let you save your files directly to your WebDAV server (from the File > Save option). Other applications lack this functionality, so what you should do is create your files locally (on client computer) and then Cut the files and Paste them to the remote server.
Accessing the WebDAV server from Ubuntu
This is pretty simple too.
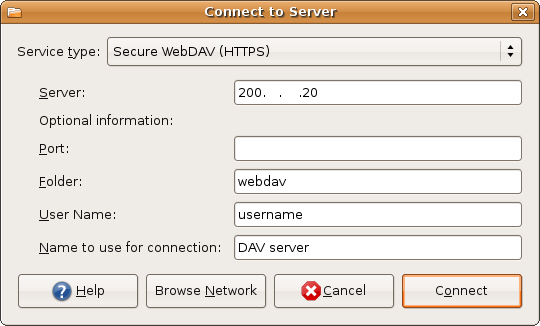
First go to the Places menu and select Connect to Server…

Select the Service Type – in my case SecureWebDAV (HTTPS) – and type the required information:
After pressing the Connect button the window will close. You can access now your server by double clicking its icon on the desktop:
or from the Places area on any File Browser window (Nautilus):
Conclusion
This is not an utopical solution but surely will help you get your important documents from wherever you are. Some problems may arise if you have a slow Internet connection or if you are working on a large document. My recommendation is to always copy your remote files to your local computer, work on them, and then move them back to the server.
Hope you find this tutorial useful.