Compiling and Debugging Oracle's Pro*C files in OS-X / Xcode
Part of my work as a Web/UNIX developer includes maintenance and development of tools using Oracle’s Pro*C.
In text interfaces, VIM is a pretty decent tool for creating source code and their companion make files. If you created the right make file, compiling is also a breeze. However things get kind of tricky when you have to debug. Oh my! This can be a difficult task. Many may say that there’s nothing like gdb, but come on guys, even you can’t deny the beauty of a visual debugger. But don’t get me wrong, I love UNIX and text interfaces, but I consider that there are tasks that can be performed more efficiently with the help of visual tools.
As a Mac/Linux desktop user I’m trying to make my life easier by compiling and debugging Pro*C files on my local computer rather than on a remote one. I have a great IDE (Xcode) and would like to take advantage of it.
So fasten your seat belts, we’re about to start.
Installing Requirements
If you have not installed Xcode yet, go ahead to the App Store and download it. It is free and includes everything you need to create C/C++ programs.
If you already use Xcode, well, congratulations. You’ve got an extra point.
Ok. The first step is to go to the Oracle web site and grab the required tools. Open Safari (or your preferred web browser) and go to Oracle – Instant Client Downloads for Mac.
Download the following packages from this place:
- Instant Client Package – Basic. This will allow you to connect to Oracle databases from your local computer and debug your programs.
- Instant Client Package – SDK. This includes the C header files required for compiling.
- Instant Client Package – Precompiler. You definitely need this one to turn your Pro*C files into C files.
Unzip all files into a folder such as
/opt/oracle/instantclient_11_2
The zip files you downloaded have a similar folder structure. Be careful to merge the folders’ contents rather than replace it. If you need a reference, my directory structure looks like this:
./
BASIC_LITE_README   libclntsh.dylib     libociicus.dylib    sdk
PRECOMP_README      libclntsh.dylib.11.1    libocijdbc11.dylib  uidrvci
adrci           libnnz11.dylib      ojdbc5.jar      xstreams.jar
cobsqlintf.o        libocci.dylib       ojdbc6.jar
genezi          libocci.dylib.11.1  precomp

./precomp:
admin

./precomp/admin:
pcbcfg.cfg  pcscfg.cfg

./sdk:
SDK_README  include     ottclasses.zip  procob
demo        ott     proc

./sdk/demo:
cdemo81.c       demo_procob_ic.mk   occidml.cpp     procdemo.pc
demo.mk         occidemo.sql        occiobj.cpp     procobdemo.pco
demo_proc_ic.mk     occidemod.sql       occiobj.typ

./sdk/include:
ldap.h      occiData.h  ocidef.h    odci.h      ort.h       sqlucs2.h
nzerror.h   occiObjects.h   ocidem.h    oraca.h     sql2oci.h   xa.h
nzt.h       oci.h       ocidfn.h    oratypes.h  sqlapr.h
occi.h      oci1.h      ociextp.h   ori.h       sqlca.h
occiAQ.h    oci8dp.h    ocikpr.h    orid.h      sqlcpr.h
occiCommon.h    ociap.h     ocixmldb.h  orl.h       sqlda.h
occiControl.h   ociapr.h    ocixstream.h    oro.h       sqlkpr.h
Open the Terminal application and create an environment variable that let us easily reference this new directory:
export ORACLE_HOME=/opt/oracle/instantclient_11_2
From this point and on, we will refer to this directory as $ORACLE_HOME.
Set the environment variable DYLD_LIBRARY_PATH to the directory created before:
export DYLD_LIBRARY_PATH=$ORACLE_HOME:$DYLD_LIBRARY_PATH
And create symbolic links so OS-X can find these libraries:
cd /usr/local/lib
ln -s $ORACLE_HOME/libclntsh.dylib.11.1
ln -s $ORACLE_HOME/libocci.dylib.11.1
ln -s $ORACLE_HOME/libnnz11.dylib
One last step, make these changes persistent between Terminal sessions. Edit your .bash_profile file and add them at the end.
vi ~/.bash_profile
Add the following lines at the end of the file:
export ORACLE_HOME=/opt/oracle/instantclient_11_2
export DYLD_LIBRARY_PATH=$ORACLE_HOME:$DYLD_LIBRARY_PATH
Right now we have a text environment able to compile, link and run Pro*C applications. However, we want to do it using Xcode too, don’t we?
Add Environment Variables for Xcode
Important: This method of adding environment variables is only valid for Yosemite (OS X 10.10). It varies in older versions.
So, let’s add these two environment variables to the system so Xcode can read them. The process goes as follows:
1vi ~/Library/LaunchAgents/setenv.ORACLE_HOME.plist
Copy and paste the following content:
 1<?xml version="1.0" encoding="UTF-8"?>
 2<!DOCTYPE plist PUBLIC "-//Apple//DTD PLIST 1.0//EN" "http://www.apple.com/DTDs/PropertyList-1.0.dtd">
 3  <plist version="1.0">
 4  <dict>
 5  <key>Label</key>
 6  <string>setenv.ORACLE_HOME</string>
 7  <key>ProgramArguments</key>
 8  <array>
 9    <string>/bin/launchctl</string>
10    <string>setenv</string>
11    <string>ORACLE_HOME</string>
12    <string>/opt/oracle/instantclient_11_2</string>
13  </array>
14  <key>RunAtLoad</key>
15  <true/>
16  <key>ServiceIPC</key>
17  <false/>
18</dict>
19</plist>
And now,
1vi ~/Library/LaunchAgents/setenv.DYLD_LIBRARY_PATH.plist
Copy and paste the following content:
 1<?xml version="1.0" encoding="UTF-8"?>
 2<!DOCTYPE plist PUBLIC "-//Apple//DTD PLIST 1.0//EN" "http://www.apple.com/DTDs/PropertyList-1.0.dtd">
 3  <plist version="1.0">
 4  <dict>
 5  <key>Label</key>
 6  <string>setenv.DYLD_LIBRARY_PATH</string>
 7  <key>ProgramArguments</key>
 8  <array>
 9    <string>/bin/launchctl</string>
10    <string>setenv</string>
11    <string>DYLD_LIBRARY_PATH</string>
12    <string>/opt/oracle/instantclient_11_2</string>
13  </array>
14  <key>RunAtLoad</key>
15  <true/>
16  <key>ServiceIPC</key>
17  <false/>
18</dict>
19</plist>
To avoid restarting your session, type the following commands:
1launchctl load -w ~/Library/LaunchAgents/setenv.ORACLE_HOME.plist
2launchctl load -w ~/Library/LaunchAgents/setenv.DYLD_LIBRARY_PATH.plist
– What was all that? – Well, we just set a couple environment variables in a way Xcode is able to find them – really? – yup. Read this article for more information on it: How to set an Environment Variable in Mac OS X.
We have finished this step. Let’s move on and make a test.
Creating a Test Application (without Xcode)
With all the required libraries installed it is time to create a demo application. We’ll create the first application without Xcode just to make sure everything is in place.
Copy and paste the following code into a text editor and save it as test.c.
1#include <stdio.h>
2#include <sqlca.h>
3
4int main() {
5    char *conn_string = "user/password@host:port/sid";
6    EXEC SQL CONNECT :conn_string;
7    return 0;
8}
This code is a simple Pro*C application that opens a connection to an Oracle database. You will not see anything when you run it; however it will perform a very important task: open a connection to your database.
Make sure you change the parameters for conn_string using the following guide:
- user: the user name
- password: the password
- host: the IP address or hostname of the database
- port: the port. Oracle’s default port is
1521. - sid: the database SID. For Oracle XE this value is usually
XE.
Ok, it’s time to compile it and run it!
Compiling our Test Application
Every Pro*C program must be precompiled. In other words, we need to turn all those EXEC SQL instructions into regular C code. We use proc to do it and you can find it inside your $ORACLE_HOME/sdk folder. The syntax is very simple:
proc <source-file> <target-file>
Where source-file is the source file you wrote and target-file is the resulting pure C file. In this case, we will precompile our code the following way:
$ORACLE_HOME/sdk/proc sys_include=/Developer/SDKs/MacOSX10.6.sdk/usr/include,$ORACLE_HOME/sdk/include test.c test-pro.c
Pro*C/C++: Release 10.2.0.4.0 - Production on Thu Dec 4 19:34:06 2014

Copyright (c) 1982, 2011, Oracle and/or its affiliates.  All rights reserved.

System default option values taken from: $ORACLE_HOME/precomp/admin/pcscfg.cfg
– Wait a second. You just said the syntax was very simple and I see a long command there…
I’m glad you ask, we added the parameter sys_include to proc so it knows where to look for the .h files your program uses. In OS-X the common header libraries usually reside inside /Developer/SDKs/MacOSX10.X.sdk/usr/include. That’s the first one. The second one is the place where Oracle’s headers reside, that is inside $ORACLE_HOME/sdk/include. Despite this parameter can sometimes be omitted you should add it in order to avoid warnings.
Ok, at this point you should have a file named test-pro.c. Go ahead and open it with a text editor. How much did it change from the original file?
If instead the beautiful test-pro.c file you get the following error:
dyld: Library not loaded: /ade/b/3071542110/oracle/rdbms/lib/libclntsh.dylib.11.1
Referenced from: /opt/oracle/instantclient_11_2/sdk/proc
Reason: image not found
Trace/BPT trap: 5
you have to set your DYLD_LIBRARY_PATH variable as previously mentioned in this document. This error is common if OS-X cannot find any required library.
Ok, time to move ahead.
We’re now ready to compile and link test-pro.c into an actual program. You can do it as usual. But don’t forget to link against the Oracle libraries.
1gcc -I$ORACLE_HOME/sdk/include -L$ORACLE_HOME -lclntsh test-pro.c -o test
For C/C++ beginners, the previous line can be interpreted as follows:
gcc, that’s our compiler.-Ilets our compiler know where to look for Oracle’s header files.-Llets the compiler know where to look for additional Oracle’s library files.-linstructs the compiler to link the resulting object file against the given library (which can be found in the directory specified by the L parameter). In this case, the library name isclntsh.test-pro.cis our source file.-ospecifies the name of our resulting file.
It is ok to get warning messages, as long as you don’t get any error.
If everything went ok (pff!, why it would not go like that?) you should now have an executable file named test. Go ahead and run it. (yay!).
1./test
The program should not output anything and should run in a decent amount of time. If it takes too long, it might be having problems finding your host. Verify that the host is reachable and the database is available.
Congratulations!, At this point you can create and compile Pro*C programs on your Mac! – umm, but you said we would be able to use Xcode and… – Ok, don’t worry, we’ll get to that point.
Configuring Xcode
– All that seems quite a bit for a simple debugging process don’t you think? – Yes, but I’m glad to tell you that is a do-it-once job.
The project setup can be broken down into the following steps:
- Create a project and add you Pro*C files.
- Add a target to precompile your Pro*C files into pure C files.
- Precompile them.
- Add your precompiled files to your project.
- Modify the default target so it uses the precompiled versions of your files.
- Enjoy the virtues of visual debugging.
Let’s work on it.
Step 1, open Xcode and create a new C project.
File > New > Project
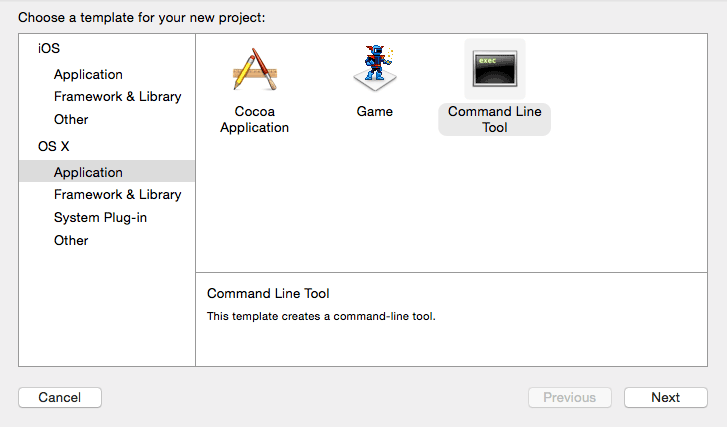
Select a C or C++ project.
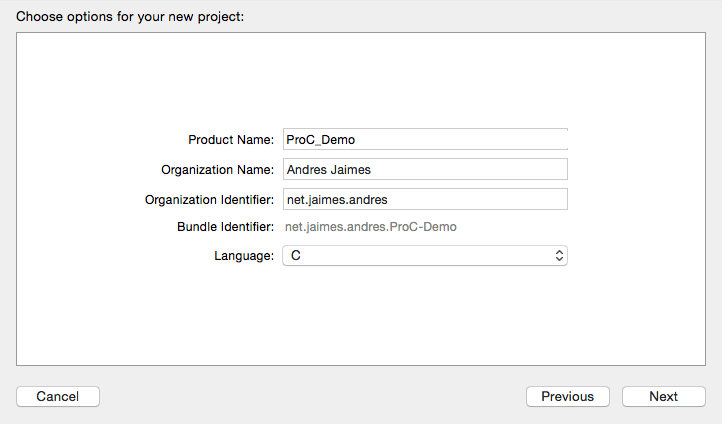
Copy and paste the following code into your main.c file (don’t forget to update the connection string):
1#include <stdio.h>
2#include <sqlca.h>
3
4int main() {
5    char *conn_string = “user/password@host:port/sid”;
6    EXEC SQL CONNECT :conn_string;
7    return 0;
8}
Step 2, since Pro*C files need to be precompiled, we have to add a new Target that perform that task.
File > New > Target
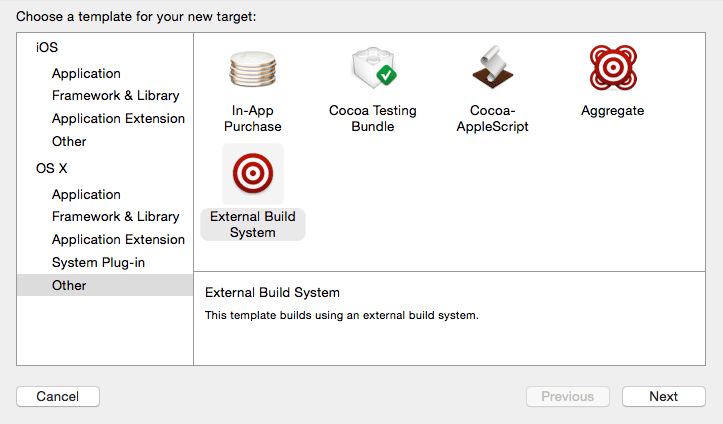
Setup the new target. This involves running the proc precompiler.
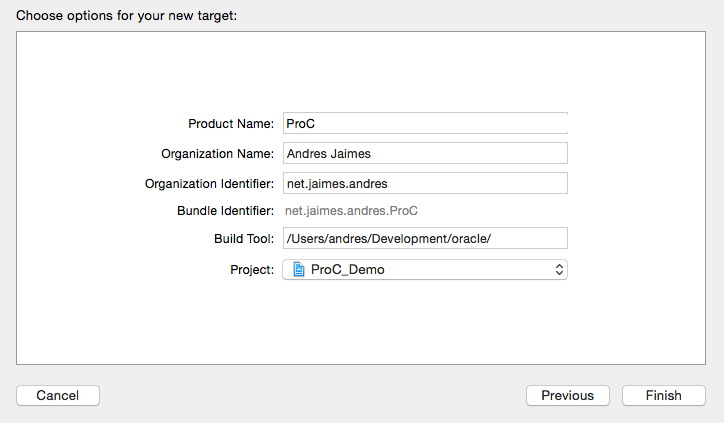

Step 3, try the precompilation target. This is easy, just press the big play button on the top.

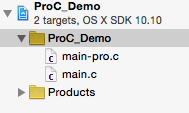
Step 4, if the previous step went fine, you should have new files in your directory. Go ahead, drag and drop them into your project.
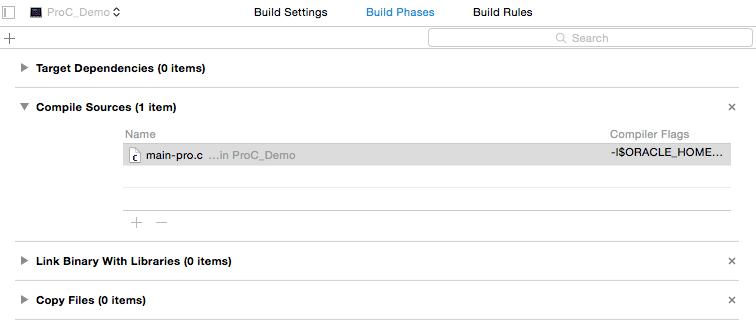
Step 5, modify your default target so it uses our new precompiled files instead of the Pro*C files and add the include path (check the “include” parameters used in the section “Compiling our Test Application”):
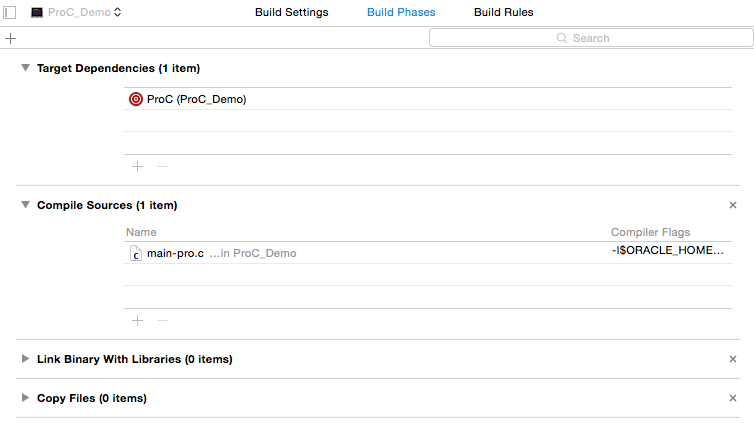
Add a dependency so it automatically runs the precompilation target:
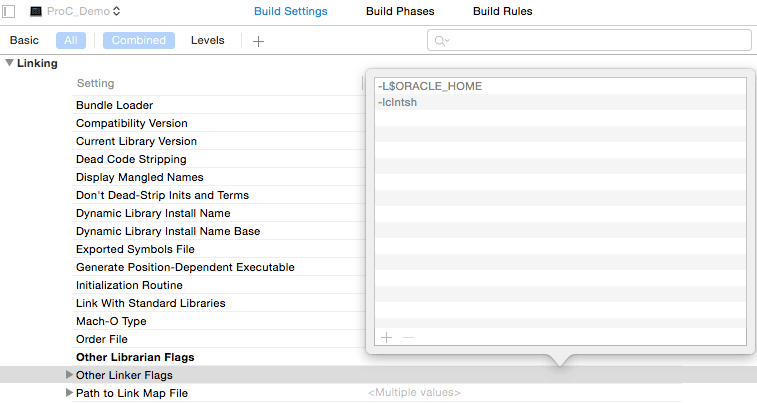
Add the linker flags (check the linker parameters used in the section “Compiling our Test Application”):
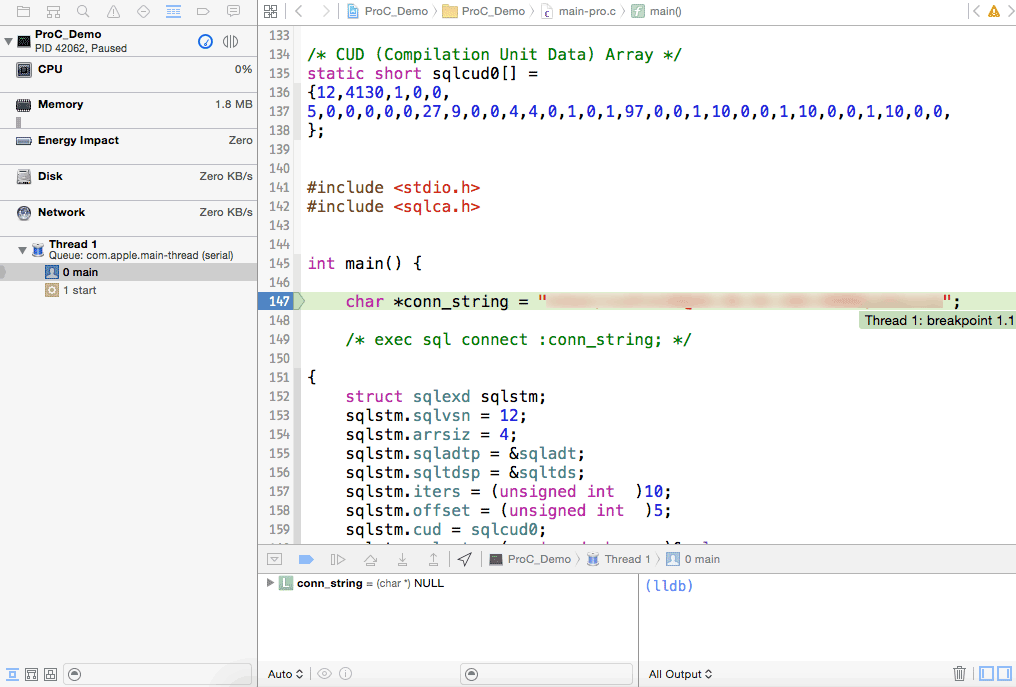
Step 6, change your target and go ahead!, run it! This is the moment when you can add breakpoints to the precompiled code and enjoy the step by step glory of debugging.

When trouble arrives
Xcode is really good at hidding some of the output generated by the Pro*C precompiler (grrr). Whenever you face a precompilation problem that does not seem to have any logic at all, use the console. We did it at the beginning of this article. Running that process from a terminal will display many more details that will lead you to a solution.
Besides that, this is a common problem you may face:
Command proc failed with exit code 11
Solution is easy, just verify that all the include files are available to your proc command.
Conclusion
If you had the patience to follow this looooong tutorial, congratulations!, you’re now part of the exclusive group of people that I admire.
No seriously, you spend a good amount of time debugging programs and when not performed with the right tools, debugging may become a nightmare. I know many people who still fill their code up with dozens of printf statements, over and over, trying to deal with a crazy pointer.
Since debugging is an inherent part of programming, we should always look for ways that allow us to tackle bugs efficiently. By being in an environment that makes you feel comfortable, you will improve your productivity and your happiness factor.
I hope you found this article interesting. If so, please share it and/or leave a message.
Happy debugging!
